Field notes
10 min read
Adopting RBAC to Manage Hundreds of VMs Using Teleport
My story of using Teleport, RBAC, labels, MFA, and session recording to manage SSH access across a growing fleet of virtual machines.
On this page
This story begins when I was “kidnapped” into the infra team at my current job. Previously, for the last year, I was part of the security team, and my daily routine was keeping my eyes on the SIEM, doing some pentesting, and handling incident response. Then, the day I officially belonged to the infra team too, they assigned me to both security and infra, and my lead asked me about my idea for managing hundreds of VMs, dozens of users, and unlimited requests. iykyk.
I started doing some research, making PoCs with several tools, and then I tried Teleport. The first run was actually really smooth. The tool was quite simple to understand: define roles, create users, assign nodes to the Teleport server, and then set permissions for each role.
To simplify what I had done, I built a lab to demonstrate how this tool works. Here is the design:
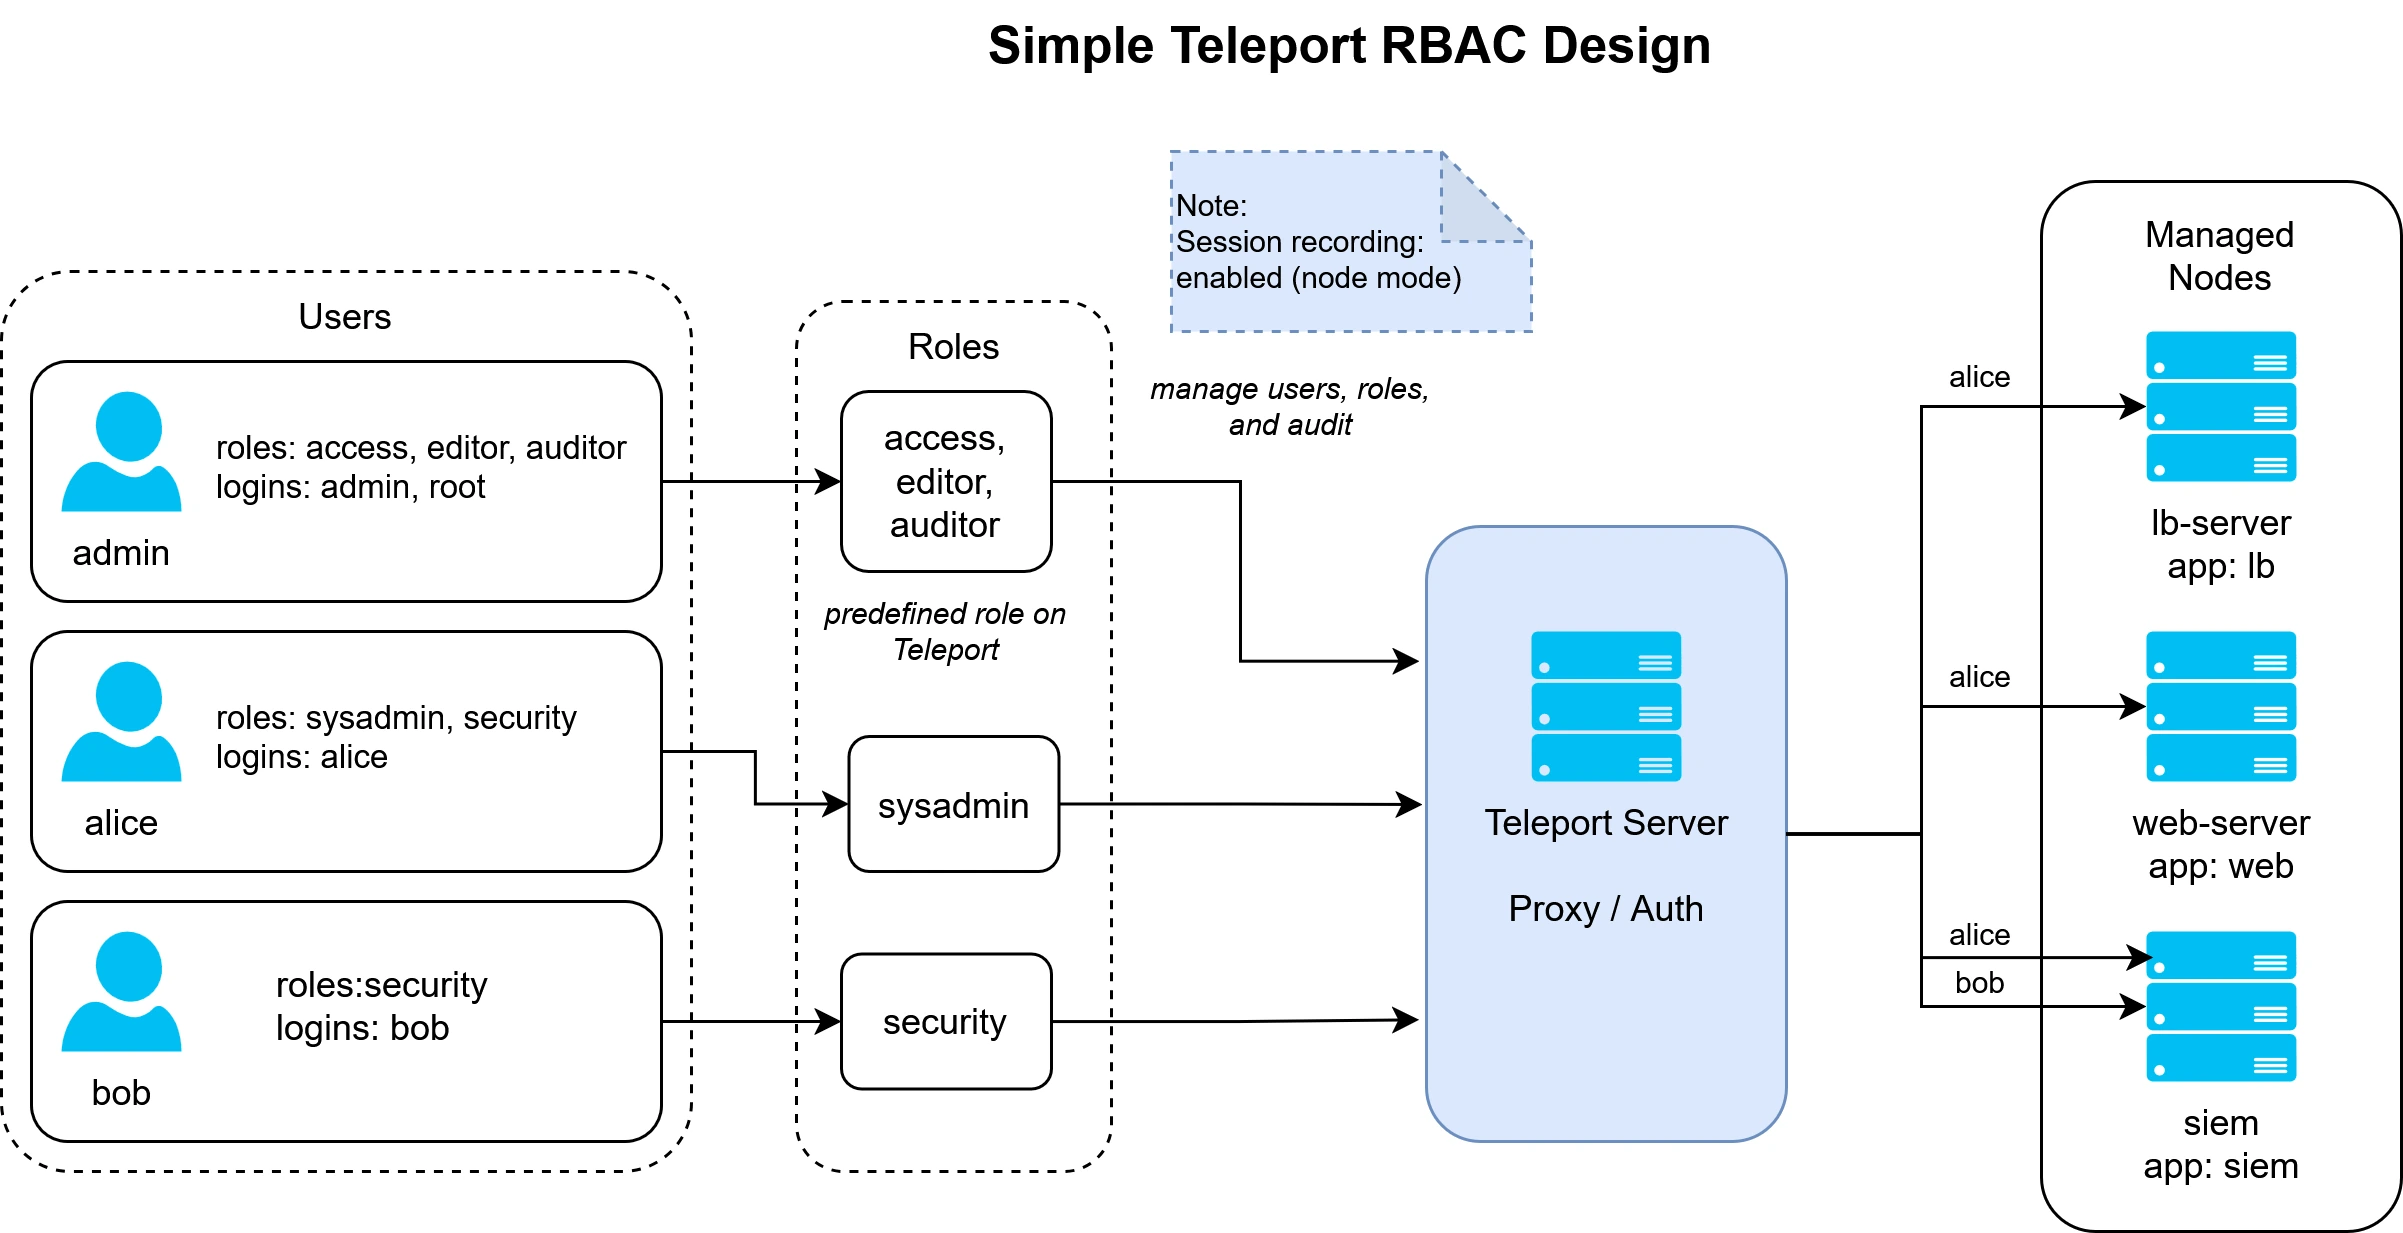
Before we jump into the config thingy, here are the terms we have in this lab:
- User: as the name suggests, a user is an account that we give to a specific person so they can access the server.
- Role: as the name suggests, a role is the function assigned to a user. In my lab, I only defined a “team-role”, which I identify as “what your team is called”. But for the real setup, I usually add a “function-role” too, which means what kind of function the user has. For example: restarting a web server, reading logs, or accessing a specific service. That’s pretty neat and applicable for my real setup.
- Teleport Server: this is where the Teleport service is deployed. In this lab, it acts as the central place for authentication, authorization, and access routing.
- Node: this represents a specific resource that we connect to the Teleport server. Currently, I only set it up for SSH servers. You can read the Teleport docs to see other types of resources.
Setup the Teleport Server
For this article, I will assume that the server is already up, so I will not write the AWS preparation part here. The AWS part is mostly about preparing the VPC, subnet, routing, security groups, and how to access the server privately. That part is not really the main focus here.
The Teleport server itself is the central component. It runs the Teleport Auth and Proxy services. The Auth service handles identity, roles, and permissions, while the Proxy service becomes the entry point for users when they want to access a node.
After the Teleport server is running, the next step is to define how users and roles should work. In my lab, the design is simple:
adminacts as the superadmin.alicebelongs tosysadminandsecurity.bobbelongs only tosecurity.
Then I registered the nodes into the Teleport server:
lb-serverweb-serversiem
The idea is that users do not directly access each server using separate SSH keys. Instead, they log in to Teleport, and Teleport decides which node they are allowed to access based on their role.
User Registration
Registering a user in Teleport is quite straightforward. We create a user, assign roles to them, and then Teleport gives an invite link for the user to finish their registration.
In my lab, I created three users:
adminalicebob
The good thing is that the user can set up their own password and MFA during registration. This is useful because access is not only protected by a password or SSH key, but also by MFA.
For example, admin has roles like access, editor, and auditor, because this account is used
for managing users, roles, and audit or session recording. Meanwhile, alice and bob are regular
users with more limited roles.
This makes the user management flow cleaner. I do not need to manually distribute credentials or ask users to share SSH keys. The user owns their account, sets up their MFA, and then I only need to assign the correct role.
Defining Role
Roles are the most important part of this setup.
In my lab, I defined the access like this:
| User | Role | Access |
|---|---|---|
admin | access, editor, auditor | Manage users, roles, audit logs, and session recordings |
alice | sysadmin, security | Access all nodes |
bob | security | Access only the SIEM node |
For the nodes, I use labels to separate them:
| Node | Label |
|---|---|
lb-server | app=lb |
web-server | app=web |
siem | app=siem |
The sysadmin role can access all nodes, while the security role can only access the SIEM node.
So Alice, who has both sysadmin and security, can access all nodes. Bob, who only has
security, can only access SIEM.
This is simple in the lab, but the concept can be expanded. In a real setup, we can use labels like:
- environment: production, staging, development
- team: infra, security, developer
- application: web, database, monitoring, SIEM
- function: log-reader, service-restart, deployment
This makes access easier to manage because we do not need to think server by server. We can manage access based on role and label.
Assigning Node to Teleport Server
Assigning a node to the Teleport server means registering the server as a resource that can be accessed from Teleport.
In my lab, I assigned three nodes:
lb-serverweb-serversiem
Each node runs the Teleport agent and connects to the Teleport server. After the node is registered, it appears in the Teleport dashboard.
This means we can access the node from a single login using one Teleport account. Users do not need to remember many IP addresses, private keys, or different login flows for every VM.
For example, Alice can log in to Teleport and see all nodes because her role allows it. Bob logs in to Teleport too, but he only sees SIEM because his role is limited to the SIEM node.
That is the part that makes this setup useful for managing many VMs.
Accessing the Node
There are two ways to access the node.
The first one is through the Teleport dashboard. Users can log in, see the resources they are allowed to access, and click connect. This is probably the easiest way for users who do not want to use too much CLI.

The image above shows that Alice can access all three nodes with the sysadmin role.
The second one is using tsh, the Teleport client. With tsh, users can log in to Teleport from
their terminal and then SSH to the node through Teleport.
Another feature that I like is host user creation. This means the Linux user does not always need to exist manually on every server before the user logs in. Teleport can create the Linux user when they access the node.
For example:
- Alice logs in as
alice. - Bob logs in as
bob. - Admin can log in as
adminorroot.
This is really useful because I do not need to create every user manually on every VM. Instead, I can manage users and roles from Teleport, and Teleport handles the login flow based on the configuration.
Gotcha Feature: “Session Recording”
Before I presented this tool in front of my coworkers, I had already done research for around three months. The research covered how to design an effective setup that could be applied while maintaining a bunch of resources.
I was too focused on the access design, roles, and node grouping. Then my lead once asked me:
“Can we monitor users’ activity here?”
At first, I read the documentation and thought that the audit feature I needed only worked in
enterprise mode. So I suggested using auditd and forwarding the logs into our log management
tools, then filtering the activity from there.
Then we sat at the same table. My lead wanted me to present what I had built and explore the features inside it, especially what we could do as a superadmin or root.
Then we found Session Recording.
Session Recording allows Teleport to record SSH sessions that happen through Teleport. So when a user connects to a node, the session can be recorded and reviewed later.
In my lab, I tested it with Alice accessing lb-server, then checked the recording from the admin
account. The session appeared with the user, target node, and timestamp.
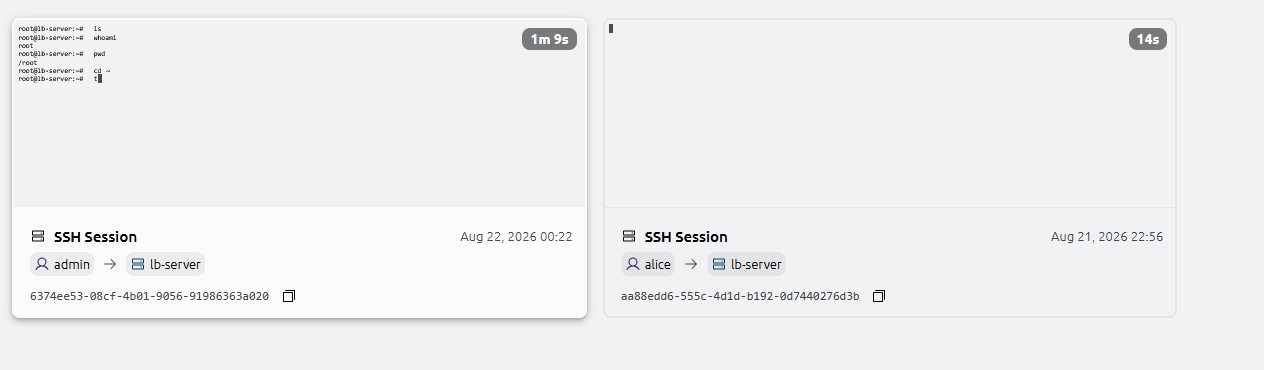
That was pretty cool, and we were kind of stunned for a moment because previously it was really hard to know what a specific user did during their SSH session. We could check shell history, logs, or SIEM events, but those do not always tell the full story clearly.
With session recording, we can replay the session and see what happened during the SSH session.
For me, this is one of the strongest features because it helps answer a very common question:
“What did this user actually do on the server?”
Some Problems I Faced
During the application, I registered around 60 VMs in production, but I also faced some issues. These are some of them:
- All nodes were connected, but some of them failed when users tried to connect.
- Teleport relies a lot on TLS, so if you have an issue with time synchronization, it will probably fail.
- Related to the “Accessing the Node” section, the user home directory created by Teleport was owned by root in some cases, so I had to change the permission manually.
But that might also be caused by my lack of competence, yk. Not necessarily Teleport’s fault.
The lab is clean, but production is always different. Some servers have different OS versions, some have old configurations, some have existing users, and some just behave weirdly for no reason. So even if the concept is simple, applying it to production still needs testing and patience.
The Pros
These are the parts that I think are useful:
- I do not need to create every single user on every single VM.
- Credentials are set up by users themselves, and they use MFA.
- Access can be managed using roles and labels.
- The dashboard is useful for checking users, nodes, audit logs, and session recordings.
- My lead was happy.
For now, my daily routine has moved from creating users to assigning users. That is much easier when dealing with many VMs, because I do not need to watch my terminal 8/5 just to create accounts across multiple servers. Teleport also has a pretty good dashboard, so checking access, users, nodes, and activity is much easier compared to doing everything manually.
Also, the preparation step for this lab actually took more time than setting up Teleport itself. lmao. I had to set up the VPC, subnet, routing, security groups, and other AWS thingy first since I built this on AWS, fancy.
Closing
That was a pretty cool experience. This simple lab might not cover all the real problems I faced in production, but I hope it provides an overview of how Teleport can be used to manage SSH access with RBAC, MFA, and session recording.
In the end, the biggest change for me is pretty simple: less time creating users on every VM, more time assigning the right access to the right user.